- See, at a glance, who your hottest, most recently engaged prospects are.
- Convert (far) more of these hot leads faster and more effectively.
Fair warning…
This article is long. And kinda techy at times.
That’s because I want to give you DIY’ers the deets on exactly how to set this up for themselves. So I actually walk you step-by-step through the process of creating this system, yourself.
But…
If you’d rather save the ton of time and hassle you’d spend reading a techy article and DIY’ing It?
Smart. We got you.
We’ve actually done a TON of the work for you by creating a template of this funnel that loads right into your Ontraport account with a single click and it does most of what I teach in the linked article for you. All you need to do is load it into your account with a click, then follow the step-by-step tutorial videos that come with it.
This automation template normally sells for $97, but you can get it for just $9 when you purchase it in the next 72 hours!
It’s called the Hot Leads Crystal Ball campaign and it is 🔥!!!! It’s got step by step instructional videos RIGHT within the automation map that walk you through all of this stuff so you save a TON of time and avoid the overwhelm. For legit $9. No. Brainer.
You can grab it right now for 91% off the regular price 🔥😳🎉💰! Just click here and then enter the coupon code: “HotLeads9” during checkout!
And if you do decide to buy the template, you can skip reading the article below as the entire thing is handled with step-by-step instructional videos right within the campaign map!

And now for my DIY’ers…
Here’s how you can build this yourself!
Now, you may be wondering… Can’t I just use Ontraport’s lead scoring feature to tell me who my hottest leads are? And doesn’t the “last activity” field in Ontraport tell me who my most recently engaged leads are?
Sorta. But not nearly as well as what this allows. Think of Lead Scoring and Last Activity fields on their own kind of like a hammer, whereas this system and the intel it provides is more like a frickin’ laser.
First, the lead score field in Ontraport is severely limited because you’re not able to use the value in that field as a condition for creating automations. Think of “Send me or my salesperson a task to call a lead, OR send them this more aggressive sales email, but ONLY if their lead score is greater than X.” With the lead score field as it is natively in OP, you can’t do that.
Also, it provides only a vague, aggregate scoring of their interest and engagement, whereas the Hot Lead Crystal Ball campaign gives you far better, clearer, more actionable intelligence at a glance so you can market and sell better to them.
Intro & Overview
The campaign map below that I’ll guide you through creating does 3 main things:
1. It watches for when anyone on your list takes any actions that demonstrate particular interest and engagement, and it sets a respective custom field accordingly. We’ll dive into these fields later on, but here’s why we have the actions populate fields…
2. When populated, these fields will tell you how recent a given contact’s interest and engagement is in each of the above ways.
Then, it populates a field for each of the above actions with the QUANTITY of each of those actions as well, in respective fields called:
a. # of landing page visits.
b. # of site visits.
c. # of email link clicks.
PLUS, any fields for the custom actions you decide you want to track (you’ll clarify these in the planning step)!
WHY? When populated, the values in these fields will tell you how MUCH interest a given contact has (more visits = more interest).
After all, two contacts may have the same date in their “Date of most recent visit” field, but one may have a 34 in the “# of visits” field, while the other has just the one. Obviously, the lead who’s visited 34 times is the more engaged, interested, and valuable lead. Can I get an amen?
3. Finally, it lifts the value in a field called “Comprehensive Lead Score”!
This is similar to the native Lead Score field that comes with Ontraport, but it’s better because unlike the native field, this field is able to be used as a condition for setting automations later on. Again, things like if someone takes a certain action that shows they’re interested, that you may want to send a task for your sales person to give them a call, but you may ONLY want to bother with it if the person has a score of, say, 40 or higher. With this new, custom “Comprehensive Lead Score” field, you can do JUST that!
Finally, toward the end, you’ll create your ‘Hot Leads Crystal Ball’ contacts group(s) and set these fields as column headers so that you and your team have a single place to go where you can see at a glance who your hottest leads are…And again, not only how hot they are, but also the recency of their interest, and the specifics around exactly what they did…at a glance.
Think of this group like your hot lead hub! When you’re looking at this group, it’s like you’re looking at a crystal ball of your hottest leads!
No need to go into their contact record and comb through their contact log to find evidence of email link clicks, landing page or site visits. Just open your Hot Leads Crystal Ball group, sort by whatever field you care about, and voila!
Step 1: Do some planning!

Before we go any further, you need to take some time and do a bit of planning around what actions signify interest in your particular business and how you’d like those actions to lift your leads’ comprehensive lead score field.
You can download the companion planning PDF right here.
Once you’ve downloaded it, go through and fill out each section. Once you’re done, pick back up here.
Step 2: Set up OP tracking script
First, you’ll need to be sure that your site has the OP tracking script installed!
The tracking script is simply a snippet of code that, when installed on a page, allows Ontraport to track your site’s visitors uniquely, connecting their page visit to their contact record. This is what lets you see page visits within the Contact Log in the Contact Record.
Now, if you’ve already got the Ontraport tracking script on your site, you don’t need to do anything here.
If yours is a WP and you’ve got Ontraport’s PilotPress plugin installed, you should be all set here. If not, or if you’re not sure, you should verify.
Just go to your site, right click, then click “control (or command) F,” then search for “tracking.ontraport.com.”
If you don’t see it on the page, you need to install it.
Go do that now for your main website and any non-Ontraport landing pages before moving on to the next step. You don’t need to do anything for Ontraport landing pages, because they come with the tracking script installed, natively.
A quick note – Use Ontraport forms to bring in your opt-ins
A quick note to be sure you’re using Ontraport forms to bring in your opt-ins (at least initially).
In order for the pages to track your visitors, they must be cookied with Ontraport’s tracking cookie. This cookie is what allows Ontraport to ID the visitor as a given contact. There are several ways that Ontraport places the tracking cookie onto a contact’s browser, but the first and best way to get it on there initially is to have them fill out an Ontraport form.
A lot of people use 3rd-party forms to bring contacts into Ontraport. There are a few good reasons why people do that, which I’ll not get into, but you need to know that if you do use other-than OP forms to generate leads, those leads will not be getting cookied upon form fill out, and you’ll be losing out on that initial chance to begin tracking their site and page visits. This is super important to do for obvious reasons, including and especially that you’ll lose out on much intel about your leads.
Step 3: Create the custom fields
Now, referencing the actions you came up with in the planning guide, you’ll need to create one or two special, custom fields for each of these actions.
# of times the action is taken field:
For actions where a lead taking that particular action more than once is a sign of more interest, you’ll want to create a “# of _________” field (where you fill in the blank for whatever the particular action is). This is for things like email opens, email link clicks, and page visits (whereas it’s not relevant for things like downloading a lead magnet).
For instance, in my business, I’ve got these fields for:
- # of email link clicks.
- # of Leg Up sales page visits.
- # of website visits to TobinJarrett.com.
- …just to name a few.
You’ll create these as a NUMERIC field type.
Next you’ll create your “Date of most recent [replace with action]” fields:
These are the fields that will track the most recent date on which each respective action was taken by a given contact. The automation map will update this for you and we’ll get to that bit later, but for now, you’ll reference the planning guide and for each of the high value actions you planned out, you will also create a DATE type field for each.
For instance, in my business, I’ve got these fields for:
- Date of most recent email link click.
- Date of most recent Leg Up sales page visit.
- Date of most recent website visit to TobinJarrett.com.
- etc.
You’ll create these as a DATE type field.
Next you’ll create your “Comprehensive Lead Score” field:
This is the field that will show you the overall value of each of your leads. Since this score gets lifted each time your leads take any one of the high-value actions you distinguished in the planning guide (we’ll get to that further down), the value in this field gives you a good, comprehensive sense of your leads’ value or “heat.” Since you’ve decided by how many points the value will be lifted during the planning stage (where actions demonstrating more interest lift the score by more points than those indicative of less interest), you should wind up with a pretty accurate sense of overall interest and engagement by looking at this score.
Now, you may be wondering… Can’t I just use Ontraport’s Lead Score (“Score”) field/feature here?
Not recommended. Think of Lead Scoring kind of like a hammer, whereas this system and the intel it provides is more like a frickin’ laser.
First, the lead score field in Ontraport is severely limited because you’re not able to use the value in that field as a condition for creating automations. Think of “Send me or my salesperson a task to call a lead, OR send them this more aggressive sales email, but ONLY if their lead score is greater than X.” With the lead score field, as it is natively in OP, you can’t do that.
So that’s why we create a whole new field for this.
Just create a new Numeric type field and name it “Comprehensive Lead Score”.
When you’re through creating all the custom fields, click “Save” in the field editor screen.
Unsure how to do this? Here’s a link to the documentation on how to create a new custom field.
Step 4: Create your Hot Leads Crystal Ball Automation Map
Now that you’ve got your planning done and you’ve created the custom fields, it’s time to create the campaign map! The primary purpose of this automation map is to actively sense when your contacts take these high value actions and to update the respective fields (“# of _____” and “Date of most recent _____”) for each action taken, as well as to lift the “Comprehensive Lead Score” field by however many points you deem appropriate, given the action.
Note that some background understanding about Ontraport’s Automation Map Builder/Editor (formerly known as “Campaigns”) is very helpful, but it goes beyond the scope of this training resource, so you can go here to learn more.
1. Log into Ontraport.
2. Then go to “Automations” screen.
3. Click “+New Automation” button up top.
4. Name it something like “Hot Leads Campaign.”
Now it’s time to create each of the branches of the automation.
Each valuable action will get its own branch on the map so you’ll have as many branches on your map as you have high-value actions that you want to track and set field values for…with one extra at the end which we’ll get to later.
Each branch will have (in this order):
A trigger: This is the action they take, that, when sensed by Ontraport, adds them to the branch so that the subsequent steps in the campaign can set field values for that action.
“Update Contact” steps: These steps will be what update the 2-3 custom fields per each respective action taken (“# of times [high value action]”, “date of most recent [high value action]” and “Comprehensive Lead Score”).
A forever “Wait” step: This is where the contacts will sit after the fields are updated by the previous steps. They’ll hang out here until they take any other action that triggers them onto any other branch.
An End step: Because you have to end each branch with an End or an Exit step and we don’t want ‘em to exit the map!
You’ll create a branch for each. But let’s walk you through the creation of the first branch. Then, once that one is perfect, you can just make copies from it, then modify each of the steps in the copies so they’re updating the right fields per whatever action they’ve taken.
1. Create a new trigger: This is what adds contacts to the map / top of the branch when they take the action that this branch is all about.
a. Click the plus icon on the blank map to create a new trigger.
i. Set the trigger settings on the left-most pane, like so:
1. Who can activate this trigger? Any Contact in account.
2. If Contact is already on map, then…Add here again when triggered.
ii. Set the Trigger action itself in the main, center pane.
1. Remember in the planning workbook, on page 7, the section entitled “How will Ontraport know this action has happened?” This is the point where you’ll use what you put down for each action.
Let’s say, for instance, that you’d like to:
– Increase the Comprehensive lead score field.
– Track the date of most recent and total # of visits to a particular sales page for a product or service your business offers. If that page is an Ontraport Page, you’d select “Visits a landing page.” If it’s a page made outside of Ontraport, you’d select “Visits URL” (remembering you’ll need to be sure that page has the OP tracking script on it).
If you need more guidance on which trigger to select, you can ask OP support or consult their feature documentation here.
2. Add in “Update Contact” Steps:
#1: This first one is the step that will update the “Date of most recent _______” for the respective action this branch is triggered by.
i. Set it to update the date in that field to Today. This way whenever this action is taken by any contact, this field will be updated for that contact and accurately reflect the date they most recently took that action.
#2: This second one is the step that will update the “Total # of _______” for the respective action this branch is triggered by.
i. Set it to add +1 to the value currently in that field. This way whenever this action is taken by any contact, this field will be updated to accurately reflect the total # of times they took that action.
ii. With the above two fields update, you’ve got a clear sense of both HOW MUCH interest your lead has, PLUS how recent their interest is!
#3: This third update contact step is the step that will update the “Comprehensive Score” field. Using the intel you came up with in your planning guide, you’ll simply set it to add +X to the value currently in that field (where X = the number of points you decided you wanted to have their score lifted for that respective action). This way whenever this action is taken by any contact, their Comprehensive Lead Score field will be updated by that number of points.
Now, when displayed as column headers in a group within the Contacts Collection, the values that will begin to populate in these fields will let you see, at a glance, both the macro and the micro picture of your hottest leads!
3. Follow that up with a “Wait” step set to “Forever” and then an “End” step.
Once you’ve completed that first branch, you’ll then go through and create a new branch just like it for each of the high-value actions you came up with during the planning stage, but, of course, each of which updates the respective fields associated with that action. To save time, you can copy a branch by grabbing it by the little compass rose icon and dragging it over top of the plus sign icon next to the right-most branch on your map. Then, click “copy this and everything below.” Then, simply go through from top (trigger step) to bottom and customize it per this new action.
When you’re done, you should have a branch that look something like this for each of the high value actions you chose during your planning:

A couple of notes to remember:
When you create a branch to update fields based on key landing page visits, you may be thinking… “But I’ve got a TON of different landing pages!” Well, this should only be done for those that are your most important ones, where if they visit this page, it’s an indication of buyer behavior. So, NOT your lead magnet pages, or content pages, but more like sales pages or checkout pages. Just as a clarification, these are your landing pages made with Ontraport pages.
When you’re creating your “Clicks (any) email link” branch (highly recommended): Contacts will be added there whenever they click any link in any email. Set the link # to be the number 0 – which just means that ANY link click in any email will cause a contact to be triggered onto this branch. Now, if you have fulfillment emails that go out to customers, where there are links in them that you’d like to exclude, you could do that in a condition here, since of course, those link clicks aren’t indicative of hot lead behavior, they’re indicative of customer engagement.
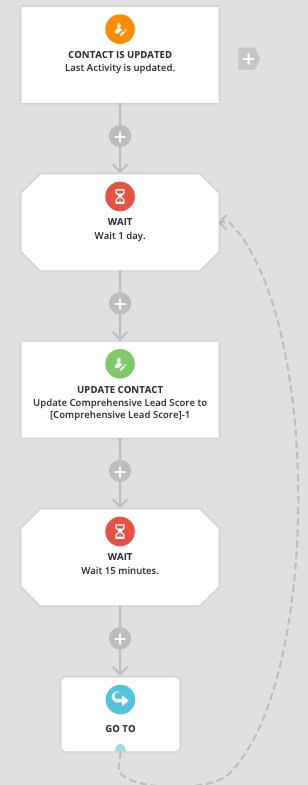
Create your score degradation branch
See, we’ve got this cool “Comprehensive Lead Score” field, but the thing is that since engagement from a lead that happened today is more valuable than the same actions that happened a year ago, we want to be able to degrade their score. Now, we’re already setting the “Date of last ______” fields for the key actions, but this last part allows us to be able to better trust that what we see in the comprehensive lead score field is an accurate reflection of their current interest and engagement, by lowering that score over time…as time passes between those high-value actions and now.
In addition to moving along the other branches in the campaign, your leads are also moved to the top of this branch every time they take any action that indicates engagement. Then, each day (a one day wait step), their score gets lowered, unless they take some other action, which starts the wait over, preventing them from having that score lowered.
So, just as you’ve done with creating each of the other branches, you’ll create a new one.
But for this one you’ll set the trigger to be “When field (Last Activity) is updated”.
Add in a one day wait below the trigger. Then the update field step that subtracts a single point from the value in the Comprehensive Lead Score field.
A good starting point is to have their score lowered by 1 point per day, however, if you wanted to lower their score more aggressively, you can have it lowered by more than 1 point per day, OR, conversely, you could increase the wait to more than 1 day, which would lower their score less aggressively.
Either way, once the “Update contact” step lowers their score, place another 15-minute wait beneath it (for insurance’s sake), then pop in a “Go-To” step here that moves them back up to that initial wait step again. Again, if they take new actions that indicate interest before that wait period is up, they’ll be moved back to the top, without having their score lowered, effectively keeping consistently-engaged leads’ scores high, just as we want!
Step 5: Create your “Hot Leads Crystal Ball” Contact Group!
Now it’s time to create your “Hot Leads Crystal Ball” group(s). This is where things get really exciting because within contact group views you can see, at a glance, just exactly who your hottest, most recently-engaged leads are! SUCH a huge leveling up from having to drill down into their contact record to see on an granular, contact-by-contact basis re: what actions they’ve taken. Imagine ending up with a contact group that looks like the one I show you in this video:
Now we’re going to create your “Hot Leads Crystal Ball” contact group and set the fields we’ve been working with fields as column headers so that you and your team have a single place to go where you can see at a glance who your hottest leads are…And again, not only how hot they are, but also the recency of their interest, and the specifics around exactly what they did…at a glance. No need to go into their contact record and comb through their contact log to find evidence of email link clicks.
To set this group up:
1. Go to the contacts screen.
2. Next, click “New Group.”
3. Now, set the criteria for the group to be: If field “Comprehensive Lead Score” is greater than 10.”
4. Now, in time, depending on how generously you were awarding points in your campaign/automation, you may decide that this is too low, and that you want to increase that to more like 25 or 50.
Note that since these fields and the automations that update them are brand new, when you first create this group, it’s going to be empty. But never fear! If you’re sending email, driving opt-ins, promoting, then this group will be filling up fast with your best leads!
5. Now, you’ll click this little icon here in the upper right to select which fields you’d like to feature as the column headers for this group. Since Ontraport lets us do this on a per each group basis, we can set them to be just those we want for this group, in particular, and your other groups’ column headers will remain as they are. As you may have suspected, we’ll be adding these hot leads fields here as the headers, including the # of link clicks and date of last link click fields, the # of last URL visit and date of last URL visit, as well as the # and date of last landing page visit pages here. Now, you may also want to show other fields here like phone number, email address, and so on.
Plus, depending on what you’re looking for, you can sort by any of the respective fields. Maybe you want to see the folks who’ve visited one of your key OP landing pages most recently. Maybe you want to see who’s visited that same page most often. Same with your site. Or maybe you want to sort by the total comprehensive lead score. Just sort by that column!
You can also create alternate versions of this group that are specifically for just page visits. Maybe you’d like a group called “Hot Recent Leads: Interest = X” where you keep that initial criterion of that their score is, say, 10 or higher, but where they’ve got a 2 or higher in the field called “# of page visits” and where the field called “Date of last page visit” is within, say, the last 30 days, or even the last 7 days.
It’s up to you. The possibilities are nearly limitless!
Step 6: Time to Test!
Now it’s time to publish and test your campaign!
Once you’re done customizing the campaign, you’ll click “Publish” in the upper right corner.
Though there is a final bonus video and step that you may choose to deploy to take this even further, I recommend you first deploy this automation as-is, testing it thoroughly first…then move on to the step in the final video as time allows.
Since this campaign, in its current state, doesn’t actually send any emails or do anything else to the contact, other than setting field values, it’s what I’d consider to be a low-risk kind of an automation. That is to say that if something doesn’t work right, it’s not going to leave you with contacts getting erroneous emails or text messages, etc. However, it’s still always good to run tests!
In order to test this, you’ll need to clear your cookies first.
Then, you’ll go to one of your Ontraport opt-in forms to get a fresh, new tracking cookie placed.
Try filling out the form with a name and email address that are clearly a test for this.
I might put something like “TobinHotLeadTest” as my name and “[email protected]” as my email address so it’s clear. By the way, since my normal company email address is [email protected], and since I use Google workspace (formerly known as G-suite) I can just use my normal email address, but add in a plus sign, and then whatever variable after “tobin” but before @ sign to effectively create a new email address for testing purposes. And though this works to create a new contact record in OP, Google treats this just like if it were [email protected]. It’s a neat trick that works also for gmail email addresses!
Then, you’ll simply take the actions you’ve set as triggers within the Hot Lead Crystal Ball campaign, sending yourself an OP email, clicking a link within it, visiting the site and pages you’ve set up in the automation!
When you do, you’ll check to be sure that the “Date of last visit” and “Date of last email click” fields got updated to today’s date, and that the “# of clicks” and “# of visits”, and Comprehensive Lead Score are lifting respectively!
Bonus next steps
Now, I recommend you deploy this campaign/automation, as-is. But when you have the time, come back and set up a high-leverage automation or two that happen as a result of your leads taking these high-interest actions, coupled with the condition “IF their Comprehensive Lead Score is greater than a certain score threshold.”
You spent some time (on pg. 12) planning for just these things in the planning guide!
So far, you’ve got everything set up to support you in always being able to know, at a glance, within your Hot Lead Crystal Ball Group, exactly who your hottest leads are, what they’ve been engaging with and when, but you can automate next steps to happen to these hottest leads to gain even more leverage, sell more, sell faster, with lower ad spend, shorter time to sale and lower sales costs!
You might consider automatically…
– Sending an (automated) email that’s written to feel super “high-touch,” just checking in to see if they have any questions…
– Sending an automated SMS message (this will only work on contacts for whom you’ve got an SMS # and who are opted in to receive SMS messages)
– Sending them a postcard in the mail with a killer offer to clinch the deal (if you’ve got mailing addresses, of course).
– Adding them to a special “Hot Leads” FB custom audience so they’re seeing FB ads specifically geared towards your hottest leads.
– Or adding them to a Hot Lead follow-up campaign/automation that does a number of the above.
Or what if you got even more ninja and combined high-touch follow up with this strategy? What if, say, they visit your sales page AND they’ve already got a score of 100+. What if this could automatically trigger a task for you or a salesperson to send a 1-to-1 email from your personal email account, or even to pick up the phone and give ‘em a call – you know, just to check-in, answer any questions?
Or an automated task to make a one-off, personalized video using Loom for these super hot leads?! In fact, you can see a recent such video I made for a very hot prospect in just this fashion. Hope it gives you some great ideas (hint: when done well, this kind of thing can work like gangbusters).
Now, drawing inspiration from the ideas above, along with what you came up with during your planning in the workbook on page 13, come up with 1-3 specific things you’d like to happen as a result of your leads reaching specific score thresholds that you think will help get them closer to buying.
If you’re feeling stuck and you’d like some coaching about how to implement these ideas, I’d love to help! You can learn more about getting coached by me and my team right here! This is the kind of thing we help our coachees with all the time!
And that’s it. Heh. If you’re one of the proud and the few who made it clear to the end of this, well then I applaud you! Now go implement the strategies I talk about and let me know your results!
got a business? we can help.
we can help you turn your business into a predictable profit machine!

I was the 3rd member of the original founding team at Ontraport.
For nearly a decade, my team and I have been helping entrepreneurs turn their businesses into predictable profit machines through great strategy and implementation.
We focus on designing strategic systems that drive revenue and profit, and save you time and hassle. We’ve got a variety of programs available for everyone, from the solopreneur just starting out to the multi-7-figure juggernaut looking to scale up even more! Click below to learn how we can help you!
Thinking of becoming an Ontraport user? Smart.
We’ve got you! Ontraport is our favorite all-in-one online marketing platform. Best of all, you can sign up for a FREE TRIAL of Ontraport through us and you’ll get LaunchPad – our incredible bundle of valuable bonuses worth $1,982.
Click here to learn more. Note that you must follow the instructions on this page to qualify for the bonuses!